Thursday, 20 February 2014

Teacup Flower Card

I enjoy finding different uses for dies and here we have the Spellbinders Teacup die used not only as a teacup, but also for the flowers.

Products used:

Spellbinders Nested Teacups die
Spellbinders foliage die
Spellbinders Labels die
Imagine Crafts/Tsukineko Radiant Neon Inks & StazOn Jet Black
12 x 10 white card folded lengthways
Natural Twine by May Arts
Stamps of your choice


Step 1: Die cut your pieces from white card and color them using Imagine Crafts/Tsukineko Radiant Neon Inks. A Fantastix, or other blending tool is perfect for this. When dry, stamp your design onto your die cuts


Step 2: Adhere your pieces to your card using Imagine Crafts/Tsukineko Creative Medium and write your tag


I hope you enjoyed this quick, easy card and thank you for stopping by!


Saturday, 2 November 2013

Spellbinders Die-Cuts and Mixed Media

One of the things I love, is to be able to incorporate most things in my crafting arsenal into any project. I don't like to compartmentalise my craft purchases, I want to use them for everything!

Spellbinders dies are perfect for mixed media and with just a few stamps, inks, or paints you can create dimensional and personal works of art and journal pages.

For this project I have chosen

Ingredients:
Spellbinders S5-028 Shapeabilities Nested Pennants
Spellbinders Font One Uppercase
Tsukineko StazOn - Azure, Vibrant Violet, Blazing Red, Jet Back
Tsukineko GlazOn
Tsukineko GooseBumps
Imagine Crafts: Monterey Pine Star
1 Sheet of 300gsm/140lb Bockingford Watercolour paper
Stamps, magazine cut-outs, or sketches of your choice
Derwent Inktense Blocks


First I took my Spellbinders die-cuts and coloured them in using Inktense blocks. I then stamped using Jet Black StazOn and used the edge of the same ink pad to hi-light the edges of the die-cuts. I then sealed them with GlazOn to give a nice satin sheen


Next I used my chosen StazOn Ink pads and gently tapped the whole pad surface over the watercolour paper. The paper has great texture and compliments the quick drying ink perfectly. I then applied a background stamp of my choice using Jet Black StazOn and used the Inktense blocks to pick out the areas that caught my eye


Here is my finished project. I used one of the pennant die-cuts as a little hat and spritzed it with GooseBumps to give texture and shine. I also used a star shape from the Imagine Crafts Monterey Pine collection. I hope this inspires you to use Spellbinders dies for your mixed media and journal pages.

Thank you for stopping by!


Sunday, 18 August 2013

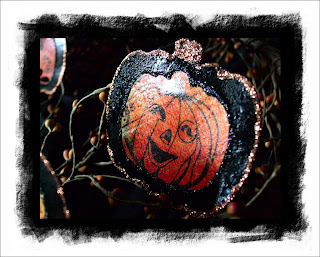
Vintage Halloween

Ingredients:

S4-227 Spellbinders Nestabilities Pumpkins - 7 Dies
S5-028 Spellbinders Shapeabilities Nested Pennants
Goosebumps by Tsukineko
300gsm Black Card
Halloween, or decorative papers of your choice
Ranger Stickles

Die cut your chosen papers into two sizes and glue together.

Next, spray your die-cuts with Goosebumps spray. This will give your die-cuts a gorgeous, textured and vintage semi-sheen. Dry with a heat gun.

Decorate around the edges of your die-cuts using Stickles, or any other glitter glue. You don't have to be neat. A few wobbly bits here and there add to their charm! Allow to dry.

When completely dry punch holes and thread with twine, or wire. They are now ready to decorate your Halloween display. Thank you for stopping by!


Sunday, 26 May 2013

Spellbinders - Quick & Easy Pages - Take 5

First of all I'd like to say a big thank you to Spellbinders for making me a 'Spellbinders International Blog Ambassador', I am proud to be part of such a great team.

Today I'd like to show you how to make quick and easy pages using the following ingredients:

Spellbinders Dies:
1) Banner Basics Two (I am using the bracket shaped die in this set with the holes)
2)Classic Rectangles Large (The third die down)

Other Items:
Grunge Paper
250gsm Cardstock
1/4 Scor-Pal Sookwang adhesive tape


Cut 10 pieces out of Grunge Paper using Spellbinders Banner Basics Two


Apply adhesive tape to the straight edges on the rough side


Cut 5 pieces from 250gsm cardstock using Spellbinders Classic Rectangles Large


Fix your die-cut rectangles up to the taped edge of your banner pieces on both sides. You should be able to see through the perforations.

You have now created pages that you can decorate as you wish and you don't have to stop there! Make as many pages as you need for your project. When your project is finished sew the pages together with twine, use book rings, chain, or even screw posts.

Below are three examples of what I have created with 5 Spellbinders, quick and easy pages.

Art Journal created entirely from Spellbinders dies. I used Arched windows One, Blossom five and Spellbinders foliage dies. The whole journal was painted on a Gelli Arts - Gel plate and sewn together with twine.


Graphic 45 French Country recipe journal using Spellbinders Address Book Die and tied together with a lace


Photo Album using Spellbinders Industrial Embossing Folder, Ranger Foil and Alcohol Ink. Held together with ball chain. The inside pages are blank for photos


I hope you have fun creating quick and easy pages using Spellbinders Dies and thank you for stopping by.


Tuesday, 14 May 2013

Sponging with Stazon


Created using:

Spellbinders embossing folder Ornamental Swirls
Stazon Inks
Acetate